The default map view for iOS, since 2012, is Apple Maps. However, you are still able to use Google Maps in your project thanks to the Google Maps SDK. Both solutions are robust, and in many cases Apple Maps might be sufficient for your needs, but for those who need or prefer using Google Maps, read on.
This tutorial will focus on integrating the Google Maps SDK in to your iOS project. I will also show you how to add Google Maps in a storyboard.
To keep the tutorial simple, we will create a project that opens a view that displays a Google Map. It will show your current location, allow you to pan and rotate as well as zoom in and out.
Google Maps API and SDK
Integrating Google Maps has a few more steps when compared to using the Apple Maps. When using Apple Maps, you drag in an MKMapView to your View Controller, and then hook it up as an IBOutlet. You can then just manipulate what you need by setting properties and overriding delegate methods as needed.
With Google Maps, we need to take care of importing the framework(s) from Google as well as linking other frameworks to the project. There are two options for this. The first uses CocoaPods and is relatively straight forward because most of the work is done for you. The second option is to install manually. We will opt for the first method, although if you want to know how to do this manually then please post a comment and I’ll amend the tutorial by showing you how to do that.
Install CocoaPods
The first step is to ensure that your Mac has CocoaPods installed. To do that, open the terminal and type:
sudo gem install cocoapods
You will be asked for your login password to authorise this. If you have previously installed CocoaPods, but didn’t realise it, then the command above will simply update it to the latest version.
The next step is to create an Xcode project for the Google Maps. You can either follow the instructions to create a Single View application here, or download the starter project here.
In terminal, navigate to the Xcode project file. I find the easiest way to do this is to open both a terminal and Finder. In terminal type cd followed by a space. In Finder, navigate to the folder that contains the project folder. Left click, hold, and drag to terminal. It will add the full folder name so that you can just hit enter and be in the correct folder as seen in the screenshot below.
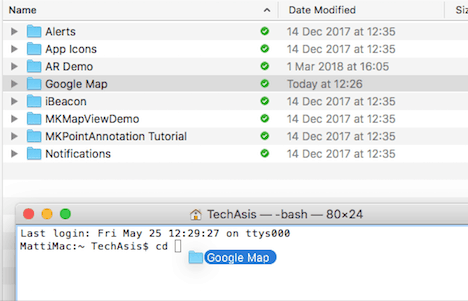
Now that you are in the correct folder you need to create a Podfile. The easiest way to do this is to type “pod init” in the terminal. In the project folder a file called Podfile will appear. Use your favourite text editor to open this file. I use Textastic, but TextEdit will be sufficient.
Edit the default file to include the line pod ‘GoogleMaps’ as well as pod ‘GooglePlaces’. You will also need to comment out the platform line (by removing the hashtag before it).
\# Uncomment the next line to define a global platform for your project
platform :ios, '9.0'

target 'Google Map' do
  \# Comment the next line if you're not using Swift and don't want to use dynamic frameworks
  use_frameworks!

  \# Pods for Google Map
  pod 'GoogleMaps'
  pod 'GooglePlaces'

end
Save the file.
Back in terminal, assuming you are still in the same directory as Podfile, run the command “pod install”. This process may take a minute or so to complete. Extra files and folders will be added to your project in that process.
When complete, the GoogleMaps SDK is now ready to use in your project. Because we used CocoaPods, we now need to launch the project in Xcode using the “Google Map.xcworkspace” file instead of the .xcodeproj file that you might be more accustomed to.
Go ahead and double click on the .xcworkspace file to launch the project. Opening with the workspace file allows the Pods project to be opened in the same “workspace” as the Google Map project we have.
Getting a Google Maps API Key
Google occasionally makes changes to the process of getting an API key for its products. Nothing really changes that much, other than sometimes a few of the steps change. I won’t go in to too much detail about getting an API key here, but the instructions found here will get you going. To start, you will want to click Get Started. Assuming that you are already logged in with your Google account it will give you various options depending on any previous activity with the API.
You will then be given an API key. Make a note of this for the next step of the project although you can easily find your key by following the link on the Google page.. It will look something like this: AIzaSyDWBfWKlqwxC5CNHSqMh_QGE80VOXH-Zqw_
In our Podfile we did instruct it to also use the Google Places API. We won’t worry about getting a key for that just yet, but will be adding it later on in another tutorial.
Using the Google Maps API Key
Open up AppDelegate.swift and near the top of the page, import GoogleMaps as follows:
import UIKit
import GoogleMaps

@UIApplicationMain
class AppDelegate: UIResponder, UIApplicationDelegate {
In the application(_:didFinishLaunchingWithOptions:) method, and before return true line, add the following:_
GMSServices.provideAPIKey(“YOUR_API_KEY”)
Replace YOUR_API_KEY with your actual API key.
Adding a Map to the View
The next step is to get a Google Map to appear on screen. To do that we will use the Storyboard and an IBOutlet.
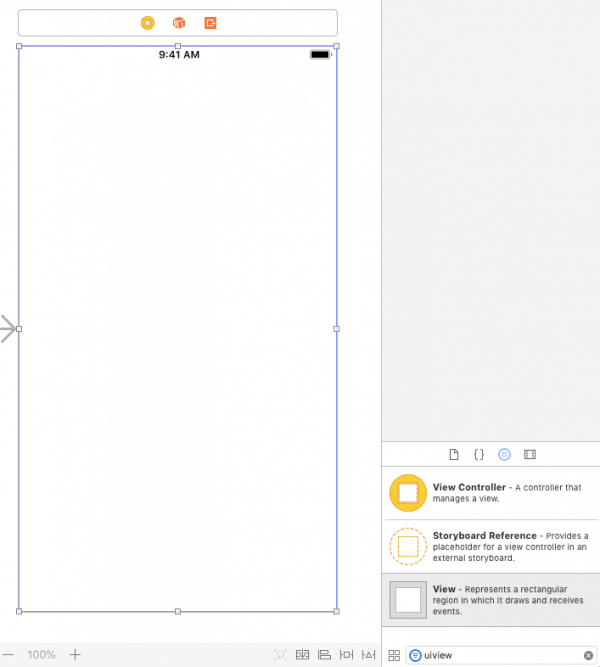
Open up Main.storyboard and drag a UIView in to ViewController as pictured below. You can increase the size of the UIView to fill the screen.
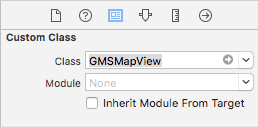
With the view selected, open the right sidebar if not already open and navigate to the Identity Inspector which is the 3 option along, as seen in the screenshot below. For class, we need to instruct it that the custom class will be GMSMapView.
Open up the Assistant Editor (central icon with 2 intersecting rings to the top right of the sidebar) and then CTRL+Drag from the new Map View to ViewController.swift just below the @class declaration line.
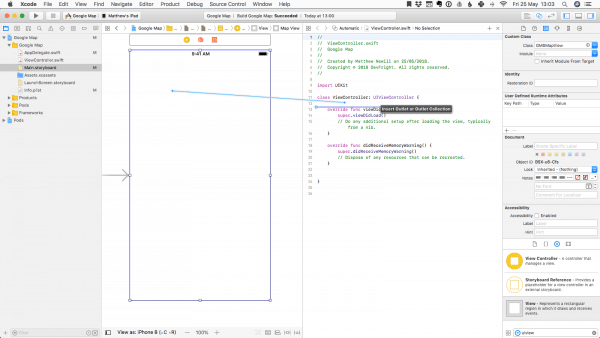
Create an IBOutlet as follows, calling it mapView.
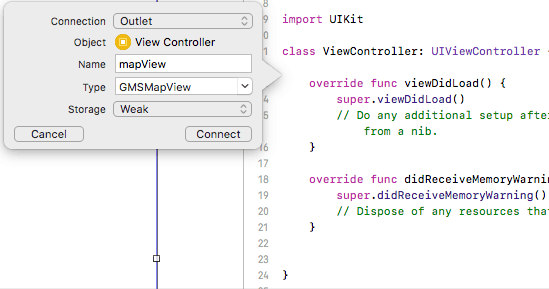
You will get an error at this point. ViewController doesn’t know what a GMSMapView is for the IBOutlet. To fix that, import GoogleMaps on line 10 just below the import UIKit line in ViewController.swift.
If you now run the app you will see a map which you can pan and zoom in and out of.
Current Location
Getting the users current location requires that we use CoreLocation. With that, we get the current user location and use that value to update the camera on the Google Map.
In ViewController, import CoreLocation, just below the import GoogleMaps line.
import UIKit
import GoogleMaps
import CoreLocation
Next, adopt the CLLocationManagerDelegate protocol where the class is declared:
class ViewController: UIViewController, CLLocationManagerDelegate
A quick scan of the CLLocationManagerDelegate file shows us that there are no required methods here (all are optional). For this part of the tutorial, we just need to implement the following:
func locationManager(_ manager: CLLocationManager, didUpdateLocations locations: [CLLocation]) {

}
We also need to create a CLLocationManager and set the delegate as well as request authorisation and start getting the locations. We do that by adding the following:
let locationManager = CLLocationManager()
override func viewDidLoad() {
    super.viewDidLoad()
    // Do any additional setup after loading the view, typically from a nib.

    locationManager.requestWhenInUseAuthorization()
    locationManager.delegate = self
    locationManager.desiredAccuracy = kCLLocationAccuracyBest
    locationManager.startUpdatingLocation()
}
On the first line we are creating a CLLocationManager object.
In this method we first “requestWhenInUseAuthorization” which is what is required to get the users permission for the app to access the location. We will cover this again in just a few moments.
We next set the delegate to self. What this means is that any location updates that become available will be sent to this class (the ViewController).
We next set the accuracy to best.
We then start updatingLocation which instructs the phone to begin providing updates when changes to location are detected.
Going back to requestWhenInUseAuthorization, we need to add an entry to Info.plist. Select the file, then right click on the first key (Information Property List) and select “add row”.
You need to edit the key name for this and set it at “NSLocationWhenInUseUsageDescription” as per the documentation.
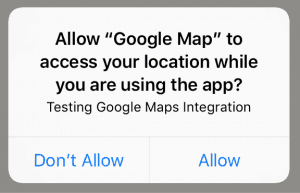 The type of key is left as a string, and the value is set to the text that you want the user to read. I just entered “Testing Google Maps Integration” for the value. The screenshot to the left shows what the prompt looks like. You will likely have seen these types of prompts before.
If you add the following line to the delegate method you implemented earlier, and then run the app, you should be prompted for permission. If you allow it, then you will see the console output a CLLocation object that contains coordinates, date, time, etc…
print(locations.last) // This will throw a warning, but you can delete the line after testing.
Setting the Camera to the Current Location
We now have the project in a place where we can set the camera to the current location of the user and zoom to that location on the map. We do that by adding some code to the didUpdateLocations delegate method as follows:
You might have noticed that the location provide is an array of CLLocation objects; hence we used locations.last and printed that to the console. Depending on how the CLLocationManager is configured, there might be several CLLocation objects in that array (such as when using deferred locations). The objects are added to the array in order that they are received. The documentation tells us that the last object in the array is the most current. For this reason, we will access the last element in the array to get the users current location.
Lets create a CLLocation and assign it the last item in the array:
let location = locations.last
The type is automatically inferred because it is declared in the delegate method name (ie, an array of CLLocation objects).
We next need to set the camera for the map. We do that as follows:
let camera = GMSCameraPosition.camera(withLatitude: (location?.coordinate.latitude)!,
											  longitude: (location?.coordinate.longitude)!,
											  zoom: 15.0)
I hard coded the zoom level to 15.0 here. If you wanted, you could programatically set that with a slider, or just allow the user to zoom by pinching; but 15.0 gives us a close enough starting level for the user to work with.
Next we need to assign the mapView.camera property with the new camera that we just created.
mapView.camera = camera
Finally, we can tell the mapView to animate to the camera as follows:
mapView.animate(to: camera)
If you run the app now the map should zoom to your current location with your location at the centre of the screen.
You can download the full project from here. If you do run this project as downloaded, make sure you navigate in terminal to the project and issue a pod update command. This will download the necessary frameworks from Google.
If you have any questions, please ask in our forums (link below).
Leave a Reply
You must be logged in to post a comment.