Updated for Xcode 13
Developing apps for the Mac or the various iOS devices requires knowledge of Xcode. Xcode is a complete developer toolset that provides all the software necessary to start coding.
The download is free and can be grabbed via the Mac App Store or via developer.apple.com. There is a lot going on in the Xcode interface, but it isn’t too tricky to start once you know where the basics are.
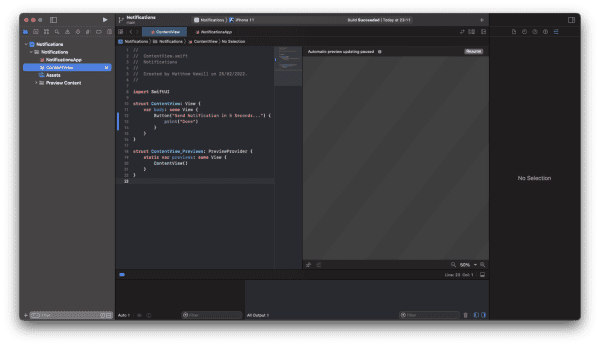
The screenshot above shows the standard layout with a left and right sidebar, a bottom bar, and the coding areas in the middle.
The left sidebar is for navigation. Several small icons run across the top. The far left one is called the Project Navigator that shows the file structure of your project. This one is typically open when you are writing code so that you can switch between classes. The next small icons include source control for if you are using Git or another source control, the Symbol Navigator, Search, Issue Navigator, Test Navigator, Debug Navigator, Breakpoint Navigator, and Report Navigator. Rather than trying to remember what each of these do, just focus on being able to find the Project Navigator so that you get a clear list and structure of the files your project has.
Above the left sidebar is the Run button which runs your app. It looks like a play button. The button to the left of that at the other side of the left column is what is used to collapse and open the left sidebar.
The middle section is where you edit your code. In the screenshot above it is divided in two because the open file is ContentView which is a SwiftUI interface. The left pane shows the code and the right pane shows what that code looks like when drawn as a user interface.
The right sidebar is mostly for inspecting items in Xcode such as setting or modifying attributes of an open file. The right sidebar will change depending on what you are doing in Xcode. You can close the sidebar with the button at the top right of the screen.
The top centre menu bar has git information on the left telling you what branch you are working from. The centre area allows you to select what device you want to run the app on for testing. You can choose a simulator device or a real device if one is attached to your Mac. It also provides other general info such as warnings/errors and what the current status is.
Although there’s a lot in the menus and many features to search through, you will find the ones you commonly use. Just stick to learning and remembering those as you use them, and for the rest, just use them if you need them.
Leave a Reply
You must be logged in to post a comment.